前回の記事でAmazon Web Service (以下AWS)のEC2にRedhat Enterprise Linux (ver6.4/x64)のインスタンスを稼働させるところまで紹介しました。せっかくの評価環境ですので評価してなんぼ。まずはapacheをインストール、ウェブサーバとして公開するところまでやってみました。本来は公開する前にセキュリティ設定が十分にされている必要がありますが、セキュリティ設定については改めて記事として紹介したいと思います。
今回、ウェブサーバとして公開する仮想サーバはセキュリティ設定は済んでいます。
1. apache インストール
仮想サーバへsshクライアントでログインします。ログイン後、suコマンドで管理ユーザーへ移行します。
apacheについて、細かいカスタムを行う場合、ソースからコンパイル・インストールを行いますが、今回はウェブサーバーを公開することが目的なのでパッケージを利用してインストールします。yumが当初より利用できますので、これを使います。
1-1. apacheパッケージの確認
httpdパッケージの確認をsearchオプションを付けて実行します。
httpdが付くパッケージ名の一覧が表示されます。
[root@www_test ~]# yum search httpd
Loaded plugins: amazon-id, rhui-lb, security
httpd.x86_64 : Apache HTTP Server
httpd-devel.i686 : Development interfaces for the Apache HTTP server
httpd-devel.x86_64 : Development interfaces for the Apache HTTP server
httpd-manual.noarch : Documentation for the Apache HTTP server
httpd-tools.x86_64 : Tools for use with the Apache HTTP Server
mod_dav_svn.x86_64 : Apache httpd module for Subversion server
mod_dnssd.x86_64 : An Apache HTTPD module which adds Zeroconf support
表示された一覧からyum -y installでhttpdとhttpd-develをインストールします。
httpd-develは開発用のパッケージですが、いつもインストールしています。この辺りは個々人の好みで。
# yum -y install httpd httpd-devel
Loaded plugins: amazon-id, rhui-lb, security
Setting up Install Process
Resolving Dependencies
--> Running transaction check
---> Package httpd.x86_64 0:2.2.15-29.el6_4 will be installed
--> Processing Dependency: httpd-tools = 2.2.15-29.el6_4 for package: httpd-2.2.15-29.el6_4.x86_64
--> Processing Dependency: apr-util-ldap for package: httpd-2.2.15-29.el6_4.x86_64
--> Processing Dependency: libaprutil-1.so.0()(64bit) for package: httpd-2.2.15-29.el6_4.x86_64
--> Processing Dependency: libapr-1.so.0()(64bit) for package: httpd-2.2.15-29.el6_4.x86_64
---> Package httpd-devel.x86_64 0:2.2.15-29.el6_4 will be installed
--> Processing Dependency: apr-util-devel for package: httpd-devel-2.2.15-29.el6_4.x86_64
--> Processing Dependency: apr-devel for package: httpd-devel-2.2.15-29.el6_4.x86_64
--> Running transaction check
---> Package apr.x86_64 0:1.3.9-5.el6_2 will be installed
---> Package apr-devel.x86_64 0:1.3.9-5.el6_2 will be installed
---> Package apr-util.x86_64 0:1.3.9-3.el6_0.1 will be installed
---> Package apr-util-devel.x86_64 0:1.3.9-3.el6_0.1 will be installed
--> Processing Dependency: openldap-devel for package: apr-util-devel-1.3.9-3.el6_0.1.x86_64
--> Processing Dependency: expat-devel for package: apr-util-devel-1.3.9-3.el6_0.1.x86_64
(中略)
Installed:
httpd.x86_64 0:2.2.15-29.el6_4 httpd-devel.x86_64 0:2.2.15-29.el6_4
Dependency Installed:
apr.x86_64 0:1.3.9-5.el6_2 apr-devel.x86_64 0:1.3.9-5.el6_2
apr-util.x86_64 0:1.3.9-3.el6_0.1 apr-util-devel.x86_64 0:1.3.9-3.el6_0.1
apr-util-ldap.x86_64 0:1.3.9-3.el6_0.1 cyrus-sasl-devel.x86_64 0:2.1.23-13.el6_3.1
db4-cxx.x86_64 0:4.7.25-18.el6_4 db4-devel.x86_64 0:4.7.25-18.el6_4
expat-devel.x86_64 0:2.0.1-11.el6_2 httpd-tools.x86_64 0:2.2.15-29.el6_4
openldap-devel.x86_64 0:2.4.23-32.el6_4.1
Dependency Updated:
db4.x86_64 0:4.7.25-18.el6_4 db4-utils.x86_64 0:4.7.25-18.el6_4
Complete!
complete!が表示されれば、apacheのインストールは完了です。あっけなくインストールが完了し、少し拍子抜け。
1-2. apacheの起動
起動前に環境に合わせて設定ファイルの編集が必要ですが、ここでは行いません。
いきなり起動させてみました。
[root@www_test ~]# /etc/init.d/httpd start
Starting httpd: httpd: apr_sockaddr_info_get() failed for www_test
httpd: Could not reliably determine the server's fully qualified domain name, using 127.0.0.1 for ServerName
[ OK ]
エラーが出てますが、起動しました。
FQDNが設定されていないよ!というエラーですが、とりあえず無視して問題ありません。
一応、プロセスが動作していることと、ポートがオープンしていることを確認します。
[ec2-user@www_test ~]$ ps -aux | grep httpd
Warning: bad syntax, perhaps a bogus '-'? See /usr/share/doc/procps-3.2.8/FAQ
root 8360 0.0 0.6 175552 3820 ? Ss 08:44 0:02 /usr/sbin/httpd
apache 8362 0.0 0.5 175688 3084 ? S 08:44 0:00 /usr/sbin/httpd
apache 8363 0.0 0.4 175688 3000 ? S 08:44 0:00 /usr/sbin/httpd
apache 8364 0.0 0.4 175688 3008 ? S 08:44 0:00 /usr/sbin/httpd
apache 8365 0.0 0.4 175688 3004 ? S 08:44 0:00 /usr/sbin/httpd
apache 8366 0.0 0.5 175688 3092 ? S 08:44 0:00 /usr/sbin/httpd
apache 8367 0.0 0.5 175688 3080 ? S 08:44 0:00 /usr/sbin/httpd
apache 8368 0.0 0.5 175688 3076 ? S 08:44 0:00 /usr/sbin/httpd
apache 8369 0.0 0.4 175688 3000 ? S 08:44 0:00 /usr/sbin/httpd
ec2-user 13102 0.0 0.1 103244 828 pts/0 S+ 19:58 0:00 grep httpd
[root@www_test ~]# netstat -nat | grep 80
tcp 0 0 :::80 :::* LISTEN
プロセス、ポート、共に問題なさそうです。
通常だとこれで外部から参照できそうなんですが、ec2の場合、外部に公開するときはさらに二つほど設定の変更が必要になります。
2. 仮想OS側の設定変更(iptablesの設定変更)
amazon ec2のredhatは最初からiptablesで入力方向のパケットにフィルタが掛かっています。
iptablesはlinuxでよく利用されるソフトウェアのFirewallです。
iptablesはOS導入時、sshとicmpしか通さない設定になっていますので、httpの利用するTCPポートの80番を許可するようにルールを追加します。
まずは現状のiptables設定を確認します。
2-1. iptablesの導入時設定確認
iptablesコマンドにオプション -Lを付けます。-Lはリストで設定一覧を表示させます。
--line-numberオプションはルールの番号を表示させます。
早速実行してみます。
[root@www_test ~]# iptables -L --line-number
Chain INPUT (policy ACCEPT)
num target prot opt source destination
1 ACCEPT all -- anywhere anywhere state RELATED,ESTABLISHED
2 ACCEPT icmp -- anywhere anywhere
3 ACCEPT all -- anywhere anywhere
4 ACCEPT tcp -- anywhere anywhere state NEW tcp dpt:ssh
5 REJECT all -- anywhere anywhere reject-with icmp-host-prohibited
Chain FORWARD (policy ACCEPT)
num target prot opt source destination
1 REJECT all -- anywhere anywhere reject-with icmp-host-prohibited
Chain OUTPUT (policy ACCEPT)
上記の設定を確認するとINPUT(入力)はsshとicmpしか許可していません。
httpを許可する場合は、INPUTチェイン内のREJECTポリシーより前に許可ポリシーを追加する必要があります。(iptablesは前から順に処理されるため)
REJECTポリシーは5番目ですので、4番目にhttp許可ポリシーを追加します。
[root@www_test ~]# iptables -I INPUT 5 -p tcp --dport http -j ACCEPT
正常に追加されるとプロンプトに戻ります。
追加されない場合はエラーが出力されます。エラーの内容を確認してコマンドを修正してください。
念のため、追加後のポリシーを確認します。
[root@www_test ~]# iptables -L --line-number
Chain INPUT (policy ACCEPT)
num target prot opt source destination
1 ACCEPT all -- anywhere anywhere state RELATED,ESTABLISHED
2 ACCEPT icmp -- anywhere anywhere
3 ACCEPT all -- anywhere anywhere
4 ACCEPT tcp -- anywhere anywhere state NEW tcp dpt:ssh
5 ACCEPT tcp -- anywhere anywhere tcp dpt:http
6 REJECT all -- anywhere anywhere reject-with icmp-host-prohibited
Chain FORWARD (policy ACCEPT)
num target prot opt source destination
1 REJECT all -- anywhere anywhere reject-with icmp-host-prohibited
Chain OUTPUT (policy ACCEPT)
num target prot opt source destination
INPUTチェインの5番にhttp許可ポリシーが追加されています。
ポリシーの変更した内容を保存します。
# service iptables save
iptables: Saving firewall rules to /etc/sysconfig/iptables: [ OK ]
保存された内容を念のため、確認します。
# cat /etc/sysconfig/iptables
# Generated by iptables-save v1.4.7 on Thu Nov 7 09:08:05 2013
*filter
:INPUT ACCEPT [0:0]
:FORWARD ACCEPT [0:0]
:OUTPUT ACCEPT [96:17586]
-A INPUT -m state --state RELATED,ESTABLISHED -j ACCEPT
-A INPUT -p icmp -j ACCEPT
-A INPUT -i lo -j ACCEPT
-A INPUT -p tcp -m state --state NEW -m tcp --dport 22 -j ACCEPT
-A INPUT -p tcp -m tcp --dport 80 -j ACCEPT
-A INPUT -j REJECT --reject-with icmp-host-prohibited
-A FORWARD -j REJECT --reject-with icmp-host-prohibited
COMMIT
# Completed on Thu Nov 7 09:08:05 2013
問題なければこれで仮想マシン(OS)側の変更は完了です。
3. amazon ec2 管理コンソール側の変更
amazon ec2では仮想マシンへのセキュリティをセキュリティグループという単位でまとめてフィルタを設定しています。
サーバ側でfirewallの穴を開けても、セキュリティグループ側で穴を開けないと外部から接続できません。
セキュリティグループの許可設定は管理コンソールから行います。
3-1. 管理コンソールへのアクセス
管理コンソールはawsの画面から[サインアップ]すると表示される[アカウント/コンソール]から[aws management console]をクリックすると利用できます。

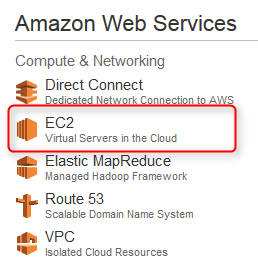
表示されたメニューから[EC2]を選択します。

3-2. セキュリティグループの選択
[Resources]から[Security Groups]をクリックします。

公開したいサーバが所属するセキュリティグループにチェックを入れます。

3-3. HTTPポートのオープン
下部にサーバの詳細が表示されます。ここからポートをオープンする設定を行います。
- [Inbound]タブをクリック
- Create a new rule:HTTPを選択
- Source:0.0.0.0/0
として [Add Rule]をクリックします。
右側のペインに80(HTTP)が追加されたことを確認します。

確認できたら、画面下にある[Add Rule Changes]をクリックします。
これで管理コンソール側の設定変更は完了です。
4. apacheの動作確認
手順3までで外部からapacheへアクセスできる準備ができましたので、確認を行います。
アクセスできない場合は、手順3までを再度、確認して下さい。
4-1. apacheデフォルト画面の表示
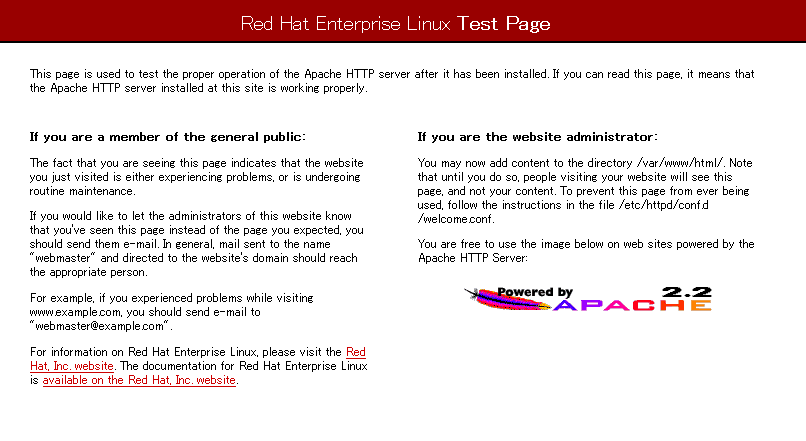
利用しているブラウザに以下のURLを入力して、apacheのデフォルト画面が表示されることを確認します。
http://グローバルIP (もしくはパブリックDNS名)
正常にインストール、ポートオープンが終了していると、以下の画面が表示されます。

これでapacheのインストールは完了です。
デフォルトインストールのみで、設定をしていない状態ですので、必要に応じて設定を行っていきます。(通常は設定が必要となります。)
5. 今後の展開と公開後のセキュリティ
今回は、apacheのみをインストールしましたが、apache単体で利用する環境は少ないと思います。
今後はLAMPが利用できるように同じ環境へPHPとMySQLをインストール、最終的にwordpressのインストールまでを紹介していきます。
セキュリティに気をつける場合は、先ほどオープンしたポートの接続元を絞るか、ルールの削除などを行って下さい。

